Order Blocks
An order block is the last candle against the move before a strong push: the last down candle before a rally, or the last up candle before a drop. Many traders expect price to react when it comes back to that candle. FCC_EA finds order blocks for you, draws them as boxes and trades them as levels of the Liquidity Sweep method, next to (or instead of) swings, sessions and rejection blocks.
- A bullish order block is a support: it gives BUY signals.
- A bearish order block is a resistance: it gives SELL signals.
What counts as an order block
FCC_EA looks for a strong move that leaves a fair value gap, a gap between candles that only a fast move leaves behind:
- Bullish order block: the last down candle before a move up that leaves a bullish fair value gap and closes above that candle's high.
- Bearish order block: the last up candle before a move down that leaves a bearish fair value gap and closes below that candle's low.
- Break of structure (OB: Require Break of Structure?): the move must also close beyond the last swing high (bullish block) or swing low (bearish block). You get fewer blocks, but each one comes from a move that changed the structure. OB: BOS Swing Strength (bars on each side) sets how many candles on each side make a swing.
The traded level is the Mean Threshold (MT): the middle of the candle body. OB: Box sets what the box covers: the body (Body Only) or the whole candle with its wicks (Full Candle). The MT stays the middle of the body either way.
Example: an order block traded at the MT
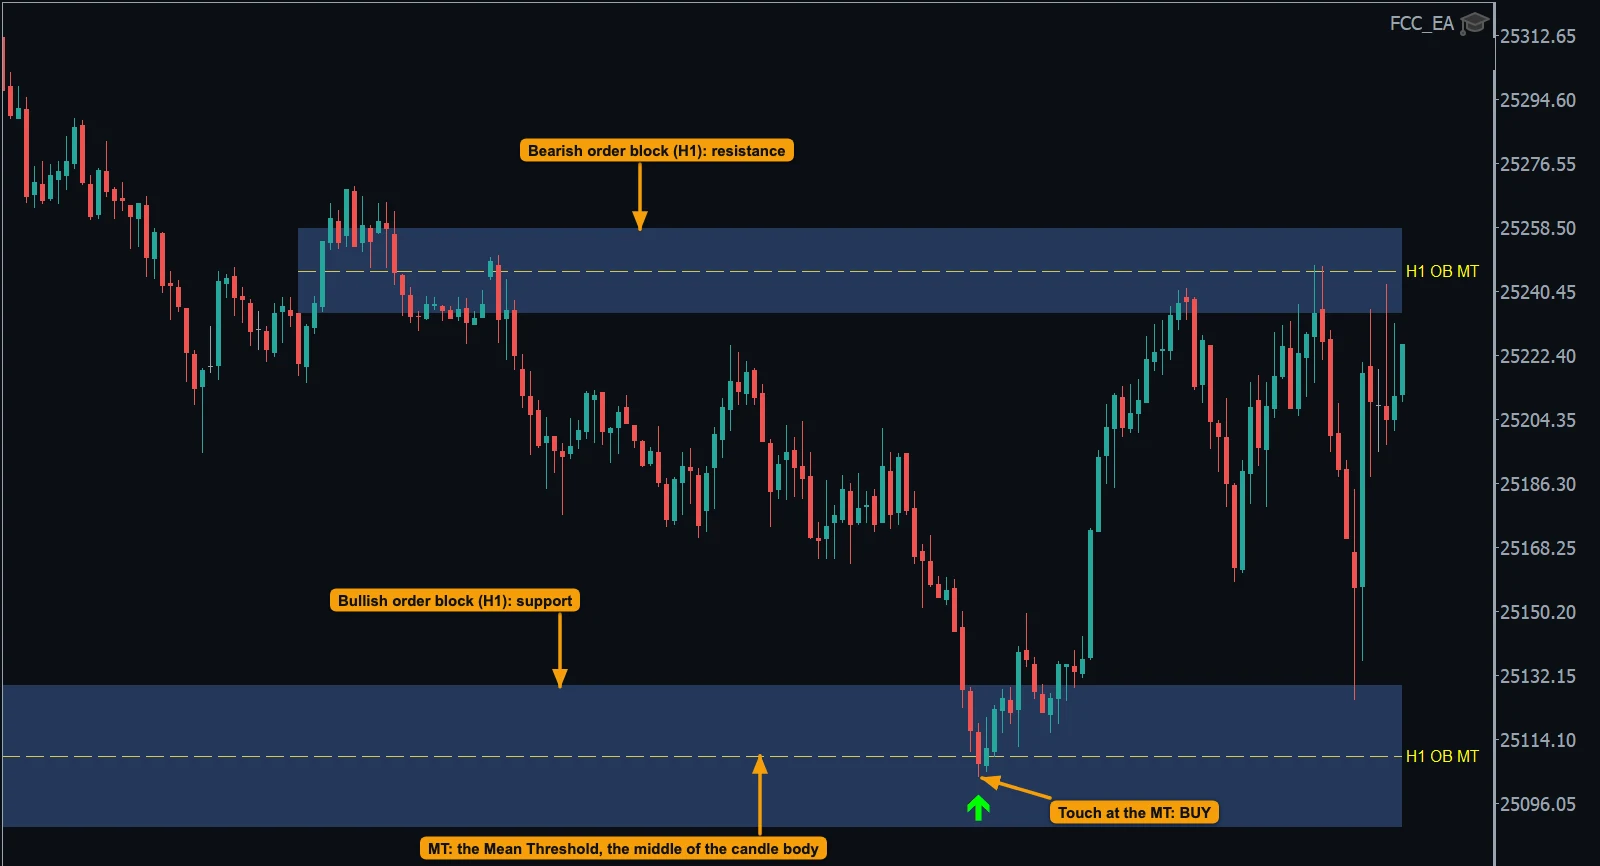
- A bullish order block found on H1: the body of the last down candle before the move up (blue box). It is a support.
- MT: the Mean Threshold, the middle of the body (dashed line, label
H1 OB MT). - Price comes back down to the MT: BUY (Touch trigger). Price then rose about 120 points.
- Above: a bearish order block from H1, a resistance for SELL setups.
Up to three timeframes
Order blocks are found on their own timeframes, whatever the chart and the Signal Timeframe show:
- OB: Timeframe 1 is always used.
- OB: Use Timeframe 2? with OB: Timeframe 2, and OB: Use Timeframe 3? with OB: Timeframe 3, add a second and a third one. A timeframe set twice is used once.
- Each timeframe keeps its own blocks. OB: Max Active Levels per Timeframe (oldest removed, 0=unlimited) limits how many each one keeps; the oldest go first.
- The label shows where a block comes from:
M15 OB MT,H1 OB MT,H4 OB MT.
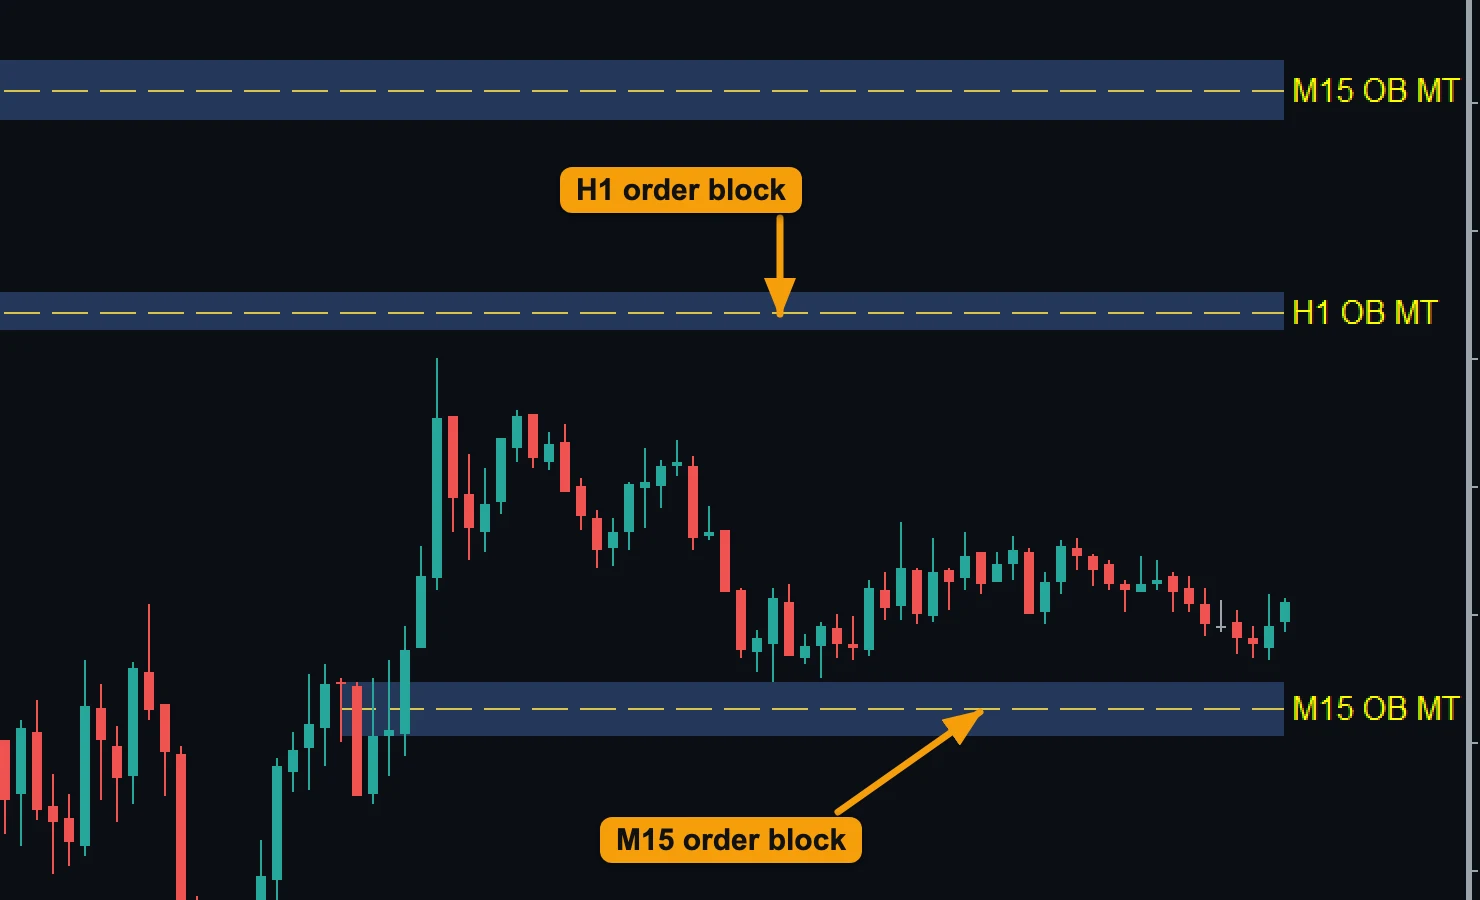
- An H1 order block, labelled
H1 OB MT. - An M15 order block, labelled
M15 OB MT. Each timeframe keeps its own blocks.
Blocks from a low timeframe are many and small; blocks from H1 or H4 are fewer and often stronger. Combining one low and one high timeframe gives both: close levels for the session and the bigger zones around them.
Rejection blocks work the same way: RB: Timeframe 1 plus the optional RB: Use Timeframe 2? and RB: Use Timeframe 3?, each with its own limit. See Liquidity Sweep.
Triggers: from a block to a trade
An order block is a level like any other in the Liquidity Sweep method, so the same Trigger Mode decides the entry:
| Trigger | What happens at the MT | OB: Retire Rule to use |
|---|---|---|
| Touch | The trade opens the moment price comes back to the MT from the block's side (from above for a bullish block, from below for a bearish one). | Any |
| Reclaim | Price goes through the MT (the sweep), then a candle of the Signal Timeframe closes back on the block's side: signal. | Wick |
| IFVG | Price goes through the MT, then FCC_EA waits for an inverted fair value gap in the block's direction and enters on its close or retest. | Wick |
Reclaim and IFVG need price to go through the MT first. MT touch and MT close end the block exactly then, so with these two triggers keep OB: Retire Rule on Wick. How the triggers work in detail: Liquidity Sweep triggers.
The filters (trend, VWAP, pivot, maximum price distance, trading hours) and the volume-spike confirmation apply to order block signals like to any other.
When a block is finished
OB: Retire Rule decides when an untraded block is removed:
- Wick: when a wick goes through the far edge of the box (the bottom of a bullish block, the top of a bearish one).
- MT touch: when price touches the Mean Threshold.
- MT close: when a candle closes beyond the Mean Threshold, the way many ICT traders treat an order block.
A block that gave a trade turns grey (Used Level Color (traded levels stay on chart)) and does not trade again; Max Trades per Level Before Removal allows more trades per block. It stays on the chart until server midnight and is remembered when FCC_EA restarts. Order blocks are found again from the chart history when FCC_EA starts and every day at server midnight, so you see the same blocks after a restart.
Choose the Liquidity Sweep method
In GENERAL SETTINGS set Signal Method to LIQUIDITY SWEEP Signals and pick the Signal Timeframe you want to enter on, for example M5.
Turn on order blocks
In LIQUIDITY SWEEP SIGNALS SETTINGS set Use Order Blocks (FVG-confirmed)? to true. To trade order blocks only, set the other sources to false: Use Swing H/L?, Use Previous Day H/L (PDH/PDL)? and any session, range or level you turned on.
Pick the timeframes
Set OB: Timeframe 1, and turn on OB: Use Timeframe 2? / OB: Use Timeframe 3? for more, for example M15 and H1. Decide on OB: Require Break of Structure? and OB: Box.
Choose the trigger and the retire rule
Set Trigger Mode to Touch, Reclaim or IFVG. With Reclaim or IFVG, set OB: Retire Rule to Wick.
Show the blocks on the chart
Turn on Display Level Lines? and Display Level Labels (Asia H, PDH, ...)? to see each block, its MT and its label. OB: Box Fill Color sets the box color.
Test it
Run the set in the Strategy Tester and on a demo account before you trade it live. Blocks, gap sizes and sessions differ per market, so test each symbol you trade.
What is the Mean Threshold?
The middle of the order block candle's body, halfway between its open and its close. FCC_EA trades this price; the box only shows the zone around it.
Do I need the break of structure check?
No. With OB: Require Break of Structure? off you get more blocks, including ones inside a range. With it on, a block counts only when the move behind it also broke the last swing.
Can I use order blocks together with other levels?
Yes. Order blocks are one of the level sources of the Liquidity Sweep method; turn on swings, the previous day high and low, sessions or rejection blocks next to them and FCC_EA trades all of them with the same trigger.
Why did a block disappear?
It was retired by OB: Retire Rule, or it was the oldest one on its timeframe when a new block came and OB: Max Active Levels per Timeframe (oldest removed, 0=unlimited) was reached.
Use case: FCC_EA for ICT & Smart Money traders: liquidity, sweeps, FVG / IFVG, order blocks, rejection blocks and killzones on one page.
All settings for this feature Liquidity Sweep Signals settings → Reclaim settings → FVG / IFVG settings →
Backtest this setup free in the Strategy Tester, and adjust it whenever the market changes; every feature is in every plan. Backtest results depend on your broker's data and don't guarantee future results.
Check the FAQ or write to us. We reply within one business day.